Asset versioning
Asset versioning
Keep revisions together when a logo, guide or presentation changes. Adding a version preserves the asset's place in the library and makes the replacement its current file.
Where to find it: Our company > Context > Assets > View details > File versions. Admins and Client admins can add or remove versions. Other workspace members can view available history and download files.
Add a replacement file
- Find the existing asset. On a computer, hover over its card or focus it with the keyboard to reveal the actions; touch devices keep the actions visible.
- Choose the information icon, View details. Check its title, description and tags, and save any changes. An uploaded Font needs a saved usage description before you can add versions.
- Scroll to File versions, choose Add version, then select one or several files allowed for that asset type.
- A single replacement opens review. Several files open How should we save these files?. Choose Versions of “the asset title” to keep them on this existing item. Separate assets creates new items instead.
- Check the preview and Upload order. The review explains that saved details and tags will be kept. Choose Upload files to start; selecting files alone does not upload them.
- Wait for saving to finish. Reopen the item's details, check the Current row and open the normal preview to verify the file.
For example, Northstar keeps one master-logo asset while the artwork changes. Its title remains “Northstar master logo” even when replacement filenames differ. The displayed format, size, download name and ordinary preview follow the current file. Uploading another file with the same filename keeps a distinct version; the name alone does not replace or merge an item.
Add several versions of the same file
Keep revisions of one logo, document or photograph together. Select the related files through the existing item's Add version control and choose Versions of “the asset title”. Use Add more files to extend the selection, then check the asset target, version count and final order before choosing Upload files.
For a group of images, the largest measured image by width × height moves last and becomes current; equal largest sizes prefer the last selected file. SVG has no fixed raster resolution. An entirely unmeasurable image group, a group containing non-image files, or a group of documents keeps selection order. Current preview identifies the file that will be current before you confirm.
Choose Separate assets when the files are different items that need independent details. To group files into a new item, use Add asset > One asset with versions. That choice creates a new item even if its title or filenames match an existing one. The saved type stays fixed.
Open or download an older version
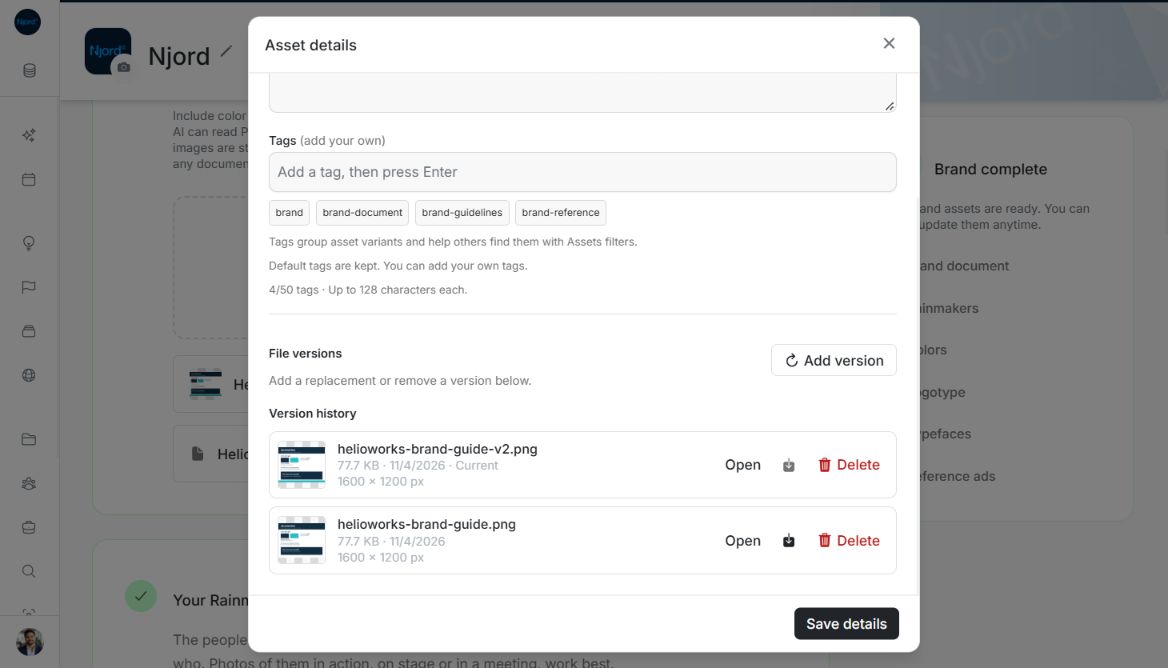
Find the required filename and date in Version history. Choose Open on that row to inspect that version, or its download icon to save that exact file. Use Load more if more history is available. Image rows show their own thumbnail and original pixel dimensions; SVG rows show Vector image. Each row also shows its filename, size, date and a Current marker where applicable.
Opening an earlier version does not make it current. To reuse an older design as the current file, download it and add it as a new version. The history has no Restore control.
Remove one version
Choose Delete on the version's row, read the warning, and confirm Delete version only when that specific file is no longer needed. This permanently removes the selected version. Links pinned to it stop working; a version still in use may be protected from deletion.
If you remove the current version, the newest remaining version becomes current. Removing the last version also removes the asset. For a Brand-owned asset, Context lets you remove a version while another remains, but sends you to Brand to remove the final version or the whole asset.
If a change does not finish
The review footer shows the current filename and its position while files save one at a time. A failure stops the queue. Use Retry remaining files to resume at the failed file; files already saved are retained. Cancelling a failed batch closes review without removing saved versions. Check history before starting a fresh batch.
A failed removal leaves the version available. If removal succeeded but history could not refresh, use Retry refresh before trying another removal.
An asset attached to an earlier Njord AI message keeps the saved version selected for that message. Adding a newer version does not rewrite that attachment.
Cancel and restart safely
- Before saving, choose Cancel to discard the staged review. Cancelling the native file picker alone returns you to the existing review.
- To start a new item, close that review and use Add asset, or the intended Brand upload area, again. To update an existing item, reopen that named item's details and choose Add version.
- Check the destination before submitting. A new item has editable title and usage fields. A replacement review explicitly says Add a version to [asset name] or Add N versions to [asset name] and keeps its saved details and tags.
- Check the grouping choice, preview, file count and order again after Add more files. Choosing files does not save them.
- After a partial failure, read the interruption message and check which items or versions have already saved. Retry remaining files continues unfinished work. Cancelling at that point leaves already saved files in the library; check history before starting another batch.
If the review names an unintended existing item, cancel without uploading and reopen the intended workflow. Confirm the workspace as well as the item name.
Image guide: Version history marks the replacement Current and keeps the older PNG with its own Open, download and Delete actions. Both originals show 1600 × 1200 pixels. Fictional local example in the normal authenticated product, shown in light theme.